Crochet Woodland Baby Mobile
6:12:00 PM
If you've visited my blog, it's no surprise that I'm pregnant with my first baby.
If you haven't visited my blog before, welcome! And guess what? I'm pregnant with my first baby!

So naturally I wanted to make everything that he needs with my own two hands. Although I can't possibly make everything I've definitely made a lot of little things for him!
I have two months left before my due date and the nursery is really coming together... like it's almost done. And I am feeling more and more relieved every time a new addition makes it in there!
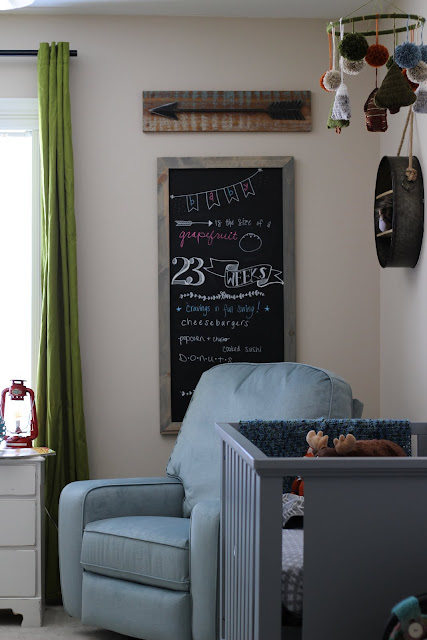

This week's triumph was this cute little crochet woodland baby mobile!

I spent a good amount of time researching mobiles - what look did I want? I wanted something that would match my theme (forrest, foxes, and bears-oh my!) but I also didn't just want to buy something from the baby supply depot that looked mass-produced and generic.
OH YEAH and those generic mobiles that sing and hook onto the crib? $50 for a woodland one! Come again?? I don't think so! Not when I could make one that was waaaaay cuter and custom made to match the nursery for about $10.
So after seeing some beautiful things on pinterest (and after becoming obsessed with my Clover Pom Pom Makers) I got to work!


The handy video tutorial is below as well as the patterns for all the little stuffies that made their way onto this mobile!
PATTERN:
Materials:
-Worsted weight yarn in grey, green, white, brown, and small amounts of tan, mustard, and red
-Size G 4mm crochet hook
-Tapestry needle
-Yarn scraps or polyfil for stuffing
-10in. embroidery hoop
Tree:
*Make 2
Begin with a slip knot in green, Ch 25
Row 1: Dc in 3rd Ch from hook, Dc in each st across, Ch 2, turn
Row 2: Dc dec in first 2 sts, Dc in next 19 sts, Dc dc in last 2 sts, Ch 2, turn
Row 3: Dc dec in first 2 sts, Dc in next 17 sts, Dc dc in last 2 sts, Ch 2, turn
Row 4: Dc dec in first 2 sts, Dc in next 15 sts, Dc dc in last 2 sts, Ch 2, turn
Row 5: Dc dec in first 2 sts, Dc in next 13 sts, Dc dc in last 2 sts, Ch 2, turn
Row 6: Dc dec in first 2 sts, Dc in next 11 sts, Dc dc in last 2 sts, Ch 2, turn
Row 7: Dc dec in first 2 sts, Dc in next 9 sts, Dc dc in last 2 sts, Ch 2, turn
Row 8: Dc dec in first 2 sts, Dc in next 7 sts, Dc dc in last 2 sts, Ch 2, turn
Row 9: Dc dec in first 2 sts, Dc in next 5 sts, Dc dc in last 2 sts, Ch 2, turn
Row 10: Dc dec in first 2 sts, Dc in next 3 sts, Dc dc in last 2 sts, Ch 2, turn
Row 11: Dc dec in first 2 sts, Dc in next st, Dc dc in last 2 sts, Ch 2, turn
Row 12: Dc dec, Dc dec, Ch 2, turn
Row 13: Dc dec, finish off, weave ends
Sc 2 triangles together around edges, leaving 2in. space to stuff with yarn scraps or polyfil stuffing, Sc to close gap
Stump: With brown, attach yarn in bottom of triangle just off center by 2 sts, Ch 2
Row 1: Dc in next 5 sts, Ch 2 turn
Rows 2-3: Repeat row 1, finish off, weave ends
Mountain:
*Make 2
Begin with a slip knot in grey, Ch 25
Row 1: Dc in 3rd Ch from hook, Dc in each st across, Ch 2, turn
Row 2: Dc dec in first 2 sts, Dc in next 19 sts, Dc dc in last 2 sts, Ch 2, turn
Row 3: Dc dec in first 2 sts, Dc in next 17 sts, Dc dc in last 2 sts, Ch 2, turn
Row 4: Dc dec in first 2 sts, Dc in next 15 sts, Dc dc in last 2 sts, Ch 2, turn
Row 5: Dc dec in first 2 sts, Dc in next 13 sts, Dc dc in last 2 sts, Ch 2, turn
Row 6: Dc dec in first 2 sts, Dc in next 11 sts, Dc dc in last 2 sts, Ch 2, turn
Row 7: Dc dec in first 2 sts, Dc in next 9 sts, Dc dc in last 2 sts, Ch 2, turn
*color change to white*
Row 8: Dc dec in first 2 sts, Dc in next 7 sts, Dc dc in last 2 sts, Ch 2, turn
Row 9: Dc dec in first 2 sts, Dc in next 5 sts, Dc dc in last 2 sts, Ch 2, turn
Row 10: Dc dec in first 2 sts, Dc in next 3 sts, Dc dc in last 2 sts, Ch 2, turn
Row 11: Dc dec in first 2 sts, Dc in next st, Dc dc in last 2 sts, Ch 2, turn
Row 12: Dc dec, Dc dec, Ch 2, turn
Row 13: Dc dec, finish off, weave ends
Sc 2 triangles together around edges, leaving 2in. space to stuff with yarn scraps or polyfil stuffing, Sc to close gap
Log Cabin:
*Make 2
Begin with a slip knot in brown (I used vanna's choice Toffee), Ch 13
Row 1: Dc in 3rd Ch from hook and in each st across, Ch 2, turn
Rows 2-14: Repeat row 1
Row 15: Dc dec in first 2 sts, Dc in next 7 sts, Dc dec in last 2 sts, Ch 2, turn
Row 16: Dc dec in first 2 sts, Dc in next 5 sts, Dc dec in last 2 sts, Ch 2, turn
Row 17: Dc dec in first 2 sts, Dc in next 3 sts, Dc dec in last 2 sts, Ch 2, turn
Row 18: Dc dec in first 2 sts, Dc in next 1 st, Dc dec in last 2 sts, Ch 2, turn
Row 19: Dc dec, Dc dec, Ch 2, turn
Row 20: Dc dec, finish off, weave ends
Sc 2 pentagons together around the 3 square sides ("floor" and two "walls" of cabin), leave the "roof" open. Suff with yarn scraps or polyfil.
Roof: Attach chocolate brown yarn at "roof" edge & Sc across to close two cabins together, Ch 1, turn, Sc back across in the "roof" to other side, finish off, weave ends.
Using tan yarn and a tapestry needle, sew stripes/lines along the cabin to look like logs. I sewed a line on every other row of stitches horizontally.
I sewed a + inside a square to look like a window in mustard on one side and a red door on the other side. The options are endless with this cute little country cabin!
I also made lots of pom poms to tie onto my mobile - here is my video tutorial on making pom poms us the Clover Pom Pom Maker!


0 comments