Granny Square Angel Ornament | Christmas Traditions CAL
9:15:00 AM
You may remember me talking a lot about my Great Grandmother Betty during my Summer Kitchen Series, when I named six patterns after her.
Needless to say, she was a VERY special lady to all who knew her and continues to inspire me daily.
She collected angels -angel everything. They were all over her home all year, but at Christmastime she pulled out boxes of angel ornaments, angel throw pillows, and other decor. She even had a cabinet full of valuable angel figurines. The lady LOVED angels.
She didn't just collect angels, but she really was an angel herself. From her open heart to her radiating positivity, she is exactly what an angel is supposed to be.
Customize her!
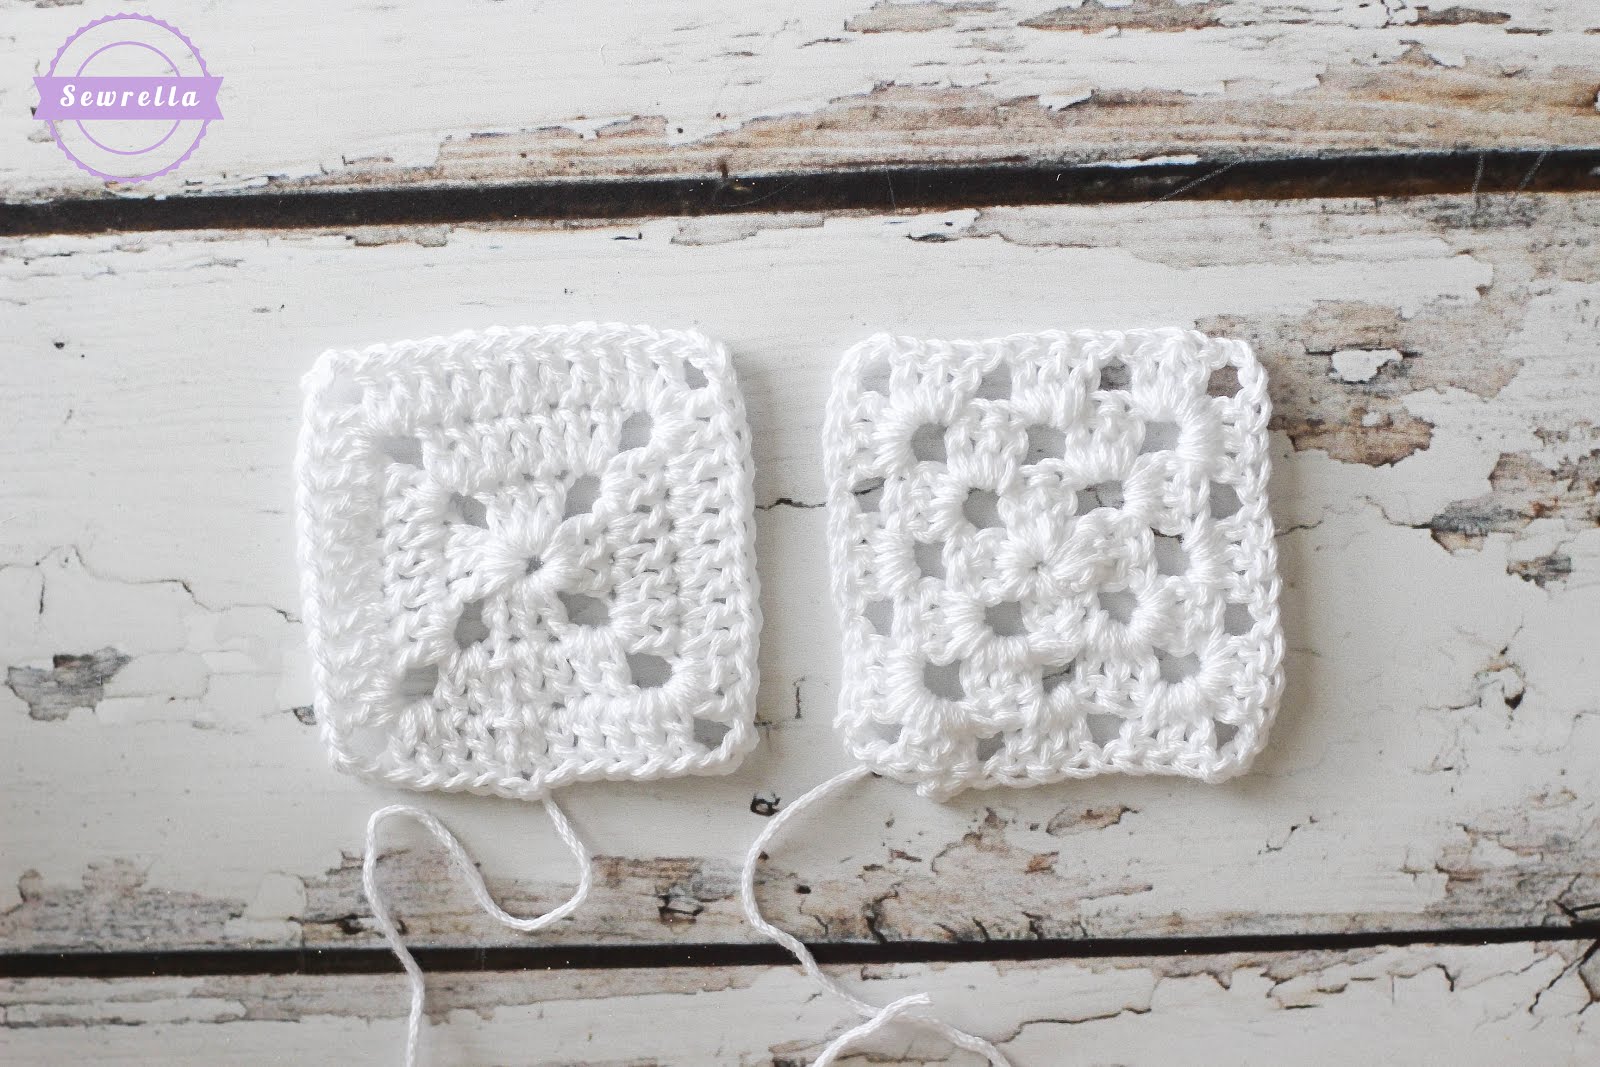
Now this angel is made up of a head and 2 granny squares. Below are both granny square patterns, one with more gaps in it (I used for her dress) and one that looks much more solid (I used for her wings). You can use either pattern for her dress and wings - make her just like mine, both dress and wings with the gappy square, both dress and wings with the solid granny square, however you like! Or make a combination of all of these and give them as gifts! (Can you say heirloom?)

THE TRADITION: This one is one of my favorites, and is SO Grandmother Betty - a random act of kindness. Whether you spend the evening making a scarf for that teacher always standing out in the cold at car rider pickup, help a pregnant woman with her groceries, or bake something sweet for the grumpy person in the cubicle next to you, there is always someone in your life who could use an angel.
You never know how much a simple act of kindness can change a person's day, week, or life. I encourage you to radiate positivity and love, as Grandmother Betty did for all of her 86 years, then hang your angel on your tree and think of all those who could use a little extra love.
PATTERN
Materials:
-Lion Brand 24/7 Cotton yarn in white and goldenrod
-Size E 3.5mm crochet hook
-Pinch of polyfil stuffing
-Tapestry needle
Head:
*Do not join your rounds, place a stitch marker in the first st of each round to keep track of where your round begins and ends, or count stitches!
With white, make a magic ring, 6 Sc inside ring (6)
Round 2: 2 Sc in each around (12)
Round 3: 2 Sc in first, Sc in next, repeat around (18)
Rounds 4-7: Sc in each around (18)
Round 8: Sc decrease, Sc in next, repeat around (12)
Round 9: Sc decrease 6 times, finish off leaving a long tail for sewing (6) *your head will be open a bit, don't be alarmed!*
Granny square #1 (gappy):
Begin with a slip knot, Ch 4, Sl St into first Ch (next to the slip knot)to form a ring, Ch 2
Round 1: 2 Dc into ring, Ch 3, 3 Dc into ring, Ch 3, 3 Dc into ring, Ch 3, 3 Dc in ring, Ch 3, sl st into top of first Dc in the round, sl st in next Dc, sl st into first Ch 3 space, Ch 2 (11 Dc)
Round 2: (2 Dc, Ch 3, 3 Dc) into Ch space, Ch 1, *(3 Dc, Ch 3, 3 Dc) in Ch space, Ch 1, repeat from * twice more, sl st into top of first Dc in the round, sl st into the next Dc, sl st into first Ch 3 space, Ch 2 (23 Dc)
Round 3: (2 Dc, Ch 3, 3 Dc) into Ch space, Ch 1, *3 Dc in Ch 1 space, Ch 1, (3 Dc, 3 Ch, 3 Dc) in Ch 3 space, Ch 1, repeat from * twice more, sl st into top of first Dc in the round, finish off leaving a long tail (36 Dc)
Granny Square #2 (solid):
Begin with a slip knot, Ch 4, Sl St into first Ch (next to the slip knot)to form a ring, Ch 2
Round 1: 2 Dc into ring, Ch 3, 3 Dc into ring, Ch 3, 3 Dc into ring, Ch 3, 3 Dc in ring, Ch 3, sl st into top of first Dc in the round, sl st in next Dc, sl st into first Ch 3 space, Ch 2 (11 Dc)
Round 2: 1 Dc, Ch 3, 2 Dc into Ch space, Dc in next 3 sts, *(2 Dc, Ch 3, 2 Dc) into Ch space, Dc in next 3 sts, repeat from * around, sl st to join, sl st in next Dc, sl st into first Ch space, Ch 2 (27 Dc)
Round 3: 1 Dc, Ch 3, 2 Dc into Ch space, Dc in next 7 sts, *(2 Dc, Ch 3, 2 Dc) into Ch space, Dc in next 7 sts, repeat from * around, sl st to join, finish off leaving a long tail (44 Dc)
Skirt:
- Fold granny square of choice as pictured (I used square #1), using a tapestry needle and the long tail whip stitch into place


With goldenrod yarn, join to the back "hem" of the dress (bottom of the piece), Sc evenly around, work 3 Sc in the front tip of the dress


Wings:
- Fold other granny square of choice as pictured (I used square #2), using goldenrod yarn, join to one edge and Sc across to join the piece together - Sc through both loops on both sides of the granny square, make 3 Sc in the Ch 3 space


Assembly:
- Stuff the head with a pinch of polyfil stuffing

- Insert top of dress into gap in head bottom and sew together


Halo:
- With goldenrod yarn, sl st into back of the head on Round 2 as pictured, Ch 15, sl st into same st as beginning, finish off


Add the wings:
- Place wings behind dress, thread tapestry needle with a long piece of white yarn, sew along the center of the wings and attach to the back seam of the dress, finish off, weave all ends


Don't forget to PIN this project to your Pinterest boards!
I hope this little angel inspires you to be an angel for someone in your life!


0 comments